Amazon

Sunday 30 August 2015

Tomato Rice (Thakkali Saadham / Tomato Bhaat)

Tomato rice


Tomato rice is in famous in Tamilnadu. There are many other varieties of rice dishes in Tamilnadu such as tamarind rice, lemon rice, pudhina rice, coconut rice, curry leaves rice etc...I will be trying these later...

I had made this one before too when one of my friend in Chennai told about this, many years before. At that time it didnot come out well. Something was not correct in that one!
Anyways, I tried this now again since its simple and easy to make. Children too can carry it for lunch to school without any side dishes. Tomato is the main ingredient in it ....


Health benefits of Tomato:


Its a great source of Vitamin C and Vitamin K. They are also a very good sources of Vitamin A,  Vitamin B6, foliate etc.
hence, tomatoes help to improve eye sight, stomach health and reduce blood pressure. 
It also gives relief from diabetics, skin problems and urinary tract infections. It can also increase digestion, stimulate blood circulation, reduce cholesterol levels and protect the kidneys etc. 


Ingredients of tomato rice

Rice - 1 cup
Tomato - 3 nos
Urad dal - 1/2 tpn
Chana dal - 1 tpn
Coriander seeds - 1 tpn
Asafoetida - a bit
Dry red chilly - 2 nos
Mustard seeds - 1/2 tpn
Onion - 2 nos
Green chillies - 2 nos
Curry leaves - 4-6nos
salt as needed


Process to make tomato rice

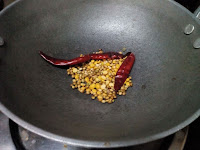
Take a pan and roast Urad dal, Chana dal, Coriander seeds in a low flame. Roast it till they becomes light brown in colour. Switch off the flame allow it to cool for some times.
Once this cools down, grind these spices in a mixie. 
Keep it aside.

Chop Onions , tomatoes and green chillies. Keep it aside.

Heat oil in a pan. Put the Mustard seeds and let it splutter. 


Then add chopped onions, chopped green chillies, curry leaves etc. 

Add a little salt and saute these till the onion becomes light brown in colour. 


Then add the chopped tomatoes in it.

Allow it to fry for sometimes till the oil leaves the sides of the pan. 


After that add the spices powder and mix thoroughly.


Lastly add the cooked rice and mix it well.


Tomato Rice (Thakkali sadham) is ready.


#tomatorice, #tamilrecipes, #vegetarianrecipes, #southindianrecipes, #kidsrecipes


Tuesday 25 August 2015

Nendhran Pazham/Etha Pazham Pradhaman (Payasam) / Banana Payasam

Nendhran Pazham Pradhaman


Nendran Pazham or Kerala Banana is widely used in Kerala and is one of the staple fruits of the state along with other fruits such as Jackfruit, pineapple etc.

Though we all are aware of the benefits of banana in general, very few of those outside Kerala know the benefits of this "King of Bananas"...

This banana is of great nutritious value and it has a rich combination of energy value, tissue building elements, proteins, vitamins and minerals. It is a good source of calories, many other nutrients and enzymes. People of Kerala traditionally use this banana as a balanced and supplementary diet. Hence, it is a wonderful nutritious diet for easy digestion, which prevents diarrhoea and worm trouble. They are also packed with vital nutrients known for preventing tummy ulcers, its potassium content may help prevent the formation of kidney stones and protect against high blood pressure and stroke, the vitamins in bananas (particularly vitamins A, C, and E) can help protect your eyesight... Boiled and mashed banana is excellent for kids even from 4 months onwards...


Ingredients for Nendran Pazham Pradhaman


Nenthra Pazham - 2 medium sized, Ripe
Jaggery - 1 Cup (200 gms)
Ghee - 3 tspn + 1 tspn
Cashew nuts - 6-8 nos
Coconut bits - 15-20
Cardamom powder - 1/4 tpn


Process for Nendran Pazham Pradhaman

Extraction of coconut milk


Step -1
Take the grated coconut and grind it in the mixie. DO NOT ADD WATER.Take the ground coconut and squeeze it with your hands to extract the milk out of it.


This is called the first coconut milk.
You will get approx. 300 ml of this. Keep it aside.

Step-2
Once the first milk is extracted, add around 100 ml of water into the ground coconut and grind it again in the mixie. 
Now take the ground coconut and squeeze it with your hands again to extract milk. 

This is the second milk and this will be dilute compared to the first milk.The second milk will be approx. 700ml. Keep it aside


Preparation of payasam

Clean and cut the plantain into 3 or 4 pieces and place them in a steamer and steam till banana is well cooked. If you donot have a steamer (in which idlis are made), you can use a pressure ccooker too.

Remove the outer skin and black coloured seed from the centre. Mash the cooked banana pieces to a paste using han.


Take a reasonably big pan. Heat it and pour ghee. 

Now saute the mashed banana paste for around 5 minutes till the water in the banana evaporates. 
Cook it in a low flame.


Meanwhile, heat 1/2 cup (100 ml) of water along with the Jaggery and let it melt. Stir it continuously and cook in medium heat until the mixture thickens. 

IN ORDER TO IDENTIFY WHETHER THE JAGGERY IS COOKED, CHECK IF IT FLOWS LIKE HONEY. THE MOMENT IT STARTS FLOWING LIKE HONEY, IT HAS GOT COOKED.

Now add this into the sauteed banana paste and mix thoroughly. Add the second extracted coconut milk. 

Keep stirring till this mixture becomes thick. Add the cardomom powder and stir well. Switch off the flame and add the first extract milk and keep aside.


Seasoning


Take a small frying pan and pour 1 tspn of ghee into it. 
Add coconut bits and fry until it turns golden brown. Next add the cashew nuts also and saute till they turn brownish. 


Add it to the nedhran pazham pradhaman...and its ready! 


#payasam, #ethapazhampradhaman, #nenthrabanana, #desserts, #keralarecipes, #vegetarian, #indianrecipes

Saturday 22 August 2015

Cabbage Thoran - Finely chopped Cabbage stir fried with grated coconut

Cabbage Thoran


Cabbage Thoran is a main dish (dry, stir fried) in Kerala for any sadhya / feast incl. Onam / Vishu Sadya.

In northern part of Kerala, thoran is also called as Upperi. 

Cabbage thoran is a very easy make dish and a very good combination for sambar, pulissery. 

In onam / vishu sadya, usually we don't use shallots or onion. Hence, I have not used these here too.

If this is not being prepard for Onam / Vishu Sadya, you can add finely shopped shallots/onion too in this.

There are multiple combinations in which cabbage thoran can be prepared such as carrot-cabbage, but for sadya/feast, its usually plain cabbage.

Click here to see how to prepare Mix Vegetable Thoran


Benefits of Cabbage:

The health benefits of cabbage include frequent use as a treatment  for constipation, stomach ulcers, headaches, obesity, skin disorders, eczema, jaundice, scurvy, rheumatism, arthritis, gout, eye disorders, heart diseases, aging etc. However, I have read somewhere that people with thyroid can avoid cabbage.

Ingredients of cabbage thoran

Cabbage - 250 gms
Green Chillies - 2 nos
Turmeric Powder - 1/4 tspn
Grated coconut - 3-4 tbspn
Urad dal - 1 tspn
Curry leaves - 4-5 nos
Mustard seeds - 1/4 tspn
Dry Red chillies - 2 nos
Salt to taste

Process to make cabbage thoran:

Finely Chop the cabbage as shown below.


Chop the green chillies in small circular shapes as shown. 

Add turmeric powder, salt and chopped green chillies into the chopped cabbage. Mix thoroughly and keep aside for 5 minutes.

Take a frying pan and pour 2 tbspns of coconut oil into it. When the oil is hot, then add mustard seeds. When the mustard splutters, put the urad dal. Keep stirring till the urad dal becomes brown. Then cut and add the dry red chillies and stir well. 

Then add the cabbage mix into it. Cover it with a lid and cook in a low flame. 

After around 10 minutes, add the grated coconut into it and mix well. 

Allow the thoran to saute for 5 minutes. Mix well.


Cabbage thoran is ready. Serves 4-5 people


#onasadya, #cabbagethoran, #thoran, #keralarecipes, #sadya

Thursday 20 August 2015

Kalan / Kaalan - Ashgourd and Yam cooked with thick Coconut paste and Yogurt gravy

Kalan / Kaalan


Kalan is the thick version of pulisherry or morozhicha kootan. My favourite too.

You can see pulissery preparation here.

My mothers kalan now I am writing this, I get that taste in my tongue of that kalan she prepares.

Usually the Kalan tastes best a day after it is prepared since the sourness of the yoghurt sets in into the curry.

Hence, Kalan is usually prepared a day before Onam.

Ingredients

Elephant Yam - 100 gms
Ash Guard - 100 gms
Green chillies - 3 nos
Pepper powder - 3/4 tspn
Turmeric powder-1/4 tspn
Kashmiri chilly powder - 1/2 tspn
Yogurt - 2 cups
Fenu greek - 1 tspn
Curry leaves - 6-8 nos
Grated coconut - 1/2 cup
Cumin seeds - 1/4 tspn
Dry red chillies - 4 nos
Mustard seeds - 1/4 tspn

We can also use plantain (raw banana) in it.
I did not get plantain so i cooked with these two vegetables. :)
Plantain are good source of calcium, also vitamin c, helps us build up immune system. It  has minerals such as Iron, Magnesium  and phosphorous. Magnesium is essential for bone strengthening and has cardiac protective role. It has good fibre content too as we are aware.

Process

Clean and Chop the Ash Guard and Elephant yam into small cubes. Add 2 glass of water while cooking. Put chilly powder, turmeric powder, salt, pepper powder and cook in a low flame.


Separately, grind the grated coconut, cumin seeds and green chillies into paste.

Keep it aside.


Once the vegetables are cooked well, add the coconut paste into it.

Mix Well.
Then add butter milk into it slowly, stirring it continuously,then only it will be thick. Keep it aside.


Tempering:


Take a small frying pan and pour 2 tablespoons oil into it.
Once the oil is hot, put mustard into it.Once the mustard completely splutters, add broken  dry red chillies, fenu greek seeds and curry leaves. Stir till the fenu greek turns dark brown.
Add this complete mix into the the curry that was kept ready aside.

Kalan / Kaalan is ready

 #kalan, #keralarecipes, #yogurt, #sadya, #vishusadya, #onamsadya

Thursday 13 August 2015

Naranga Curry / Achaar - Lemon Pickle - Kerala Style

Kerala Lemon pickle


A few months back, I posted Mango pickle. Click here to read the recipe of Mango pickle.
This time I am posting lemon pickle. But the full credit for this recipe goes to my mother-in-law. Its she who has prepared this. It is entirely different from my mothers version of Lemon pickle. This one also very different and really tasty.

As we know lemons are highly rich in Vitamin C that has huge health benefits such as improving immunity, reducing body fat etc. It improves skin improves beauty.
One of the major health benefits of drinking lemon water is that it paves way for losing weight faster. Lemon juice is also very good for cleansing out the toxins in our body.

Ingredients 

  1. Lemon - 15 nos
  2. Mustard seeds - 4-5 tbsn
  3. FenuGreek- 4-5 tbsn
  4. Green chillies - 15 nos
  5. Red chilly powder - 7-8 tbsn (Kashmiri chilly powder is preferred due to colour and texture that it imparts to the pickle). If you are using the normal chilly powder, you can use around 3-4 tbspns
  6. Asafoedita - 2 tblspn
  7. Salt to taste - Around 7-8 tbspns would be required
Salt is an excellent preservative and hence no additional preservative such as vinegar etc. is required to be added. Mustard is used in the pickle for decreasing the sourness and for increasing the thickness.


Process


First, wash and clean the lemons. 
Chop each lemon into 2 halves and then cut it into small pieces. 
Add salt, mix thoroughly and then add the chopped chillies into it and mix it thoroughly.
Keep this aside for one day .


Fry the fenugreek  seeds till it becomes dark brown colour and then grind it in a mixie to make it into a powder. 


Next take the mustard seeds and grind them to make a powder. 


Keep both these powders aside.

Prepare 2 glasses of boiled and cooled water and keep it aside.

Next add the fenugreek powder, mustard powder, Asafeodita powder, Red chilly powder into the chopped lemon-green chilly mix. 


Pour the boiled-cooled water little by little into the mix and keep mixing it thoroughly to bring in consistency. Keep it aside for 2-3 days.
Much of the water would have got absorbed into pickle. If required, add a little more of the boiled and cooled down water. Add salt if required. Keep in a tight ceramic or glass container for 2-3 days. 

In 2-3 days, lemon pickle would be ready to be consumed. 
Since this is a pickle, it must not be excessively eaten - 1-2 tbspns is the max that we must consume at a time since it contains lot of salt. 


#lemonpickle, #onam, #onasadhya, #keralasadhyarecipes

Saturday 8 August 2015

Paneer Bhurji - Crumbled Cottage Cheese in Sauteed Onions, tomatoes and spices


Paneer Bhurji is a simple easy to make North Indian dish made from crumbled  paneer or cottage cheese. This dish is also a favorite of children. It is a good dish to be served with chapati/roti or bread.

Paneer is an all-rounder when  it comes to the ways in which it can be eaten and tastes good. It is very good for health to since it is a very good source of protein, calcium and hence builds stronger teeth, bones etc. and prevents diseases.

Ingredients

  • Paneer (cottage cheese) - 200 gms
  • Tomato - 1 no(large)
  • Onion - 1 no (large)
  • Green chillies - 2 nos
  • Ginger-Garlic paste - 1 tbsn (this can also be made by grinding ginger and garlic cloves together)
  • Red chilly powder - 1/2 tsp
  • Turmeric powder - 1/4 tsp
  • Garam masala - 1/4 tsp
  • Cumin seeds - 1/2 tsp
  • Coriander leaves for garnishing
  • salt as required


 Process


1.Crumble the paneer and keep it aside.
2. Chop the onions and tomatoes and green chillies


3.Take a pan and heat oil /butter /ghee and add cumin seeds and crackle them. 

4.Then add onions into the pan and saute. When the onions get  transclucent, add the ginger-garlic paste and green chillies.


5. After this add the chopped tomatoes into it and saute till it comes soft and cooks. 


Then add red chilly powder, turmeric powder, Garam masala, and mix it well.

6. Finally  add the crumble paneer and stir it well for 2 to 3 minutes. and don't cook the paneer as a long time as it lose it softness.. 

Finally add the coriander leaves to paneer burji  and mix well.
Serve with chapati/roti or bread. Serves 2... 


#paneer, #paneerrecipes, #punjabirecipes, #kidsrecipes, #paneerbhurji

Wednesday 5 August 2015

Pesarattu Dosa or Moong Dal Dosa


Pesarattu is a Dosa like preparation  native to Andhra Pradesh. It is made with green gram and eaten as a snack or breakfast meal. It is often served with ginger chutney and  Rava upma,  also known as MLA pesarattu. It is very easy to make and good for children because it includes moong dal or green gram.

Primarly, green gram has huge nutrition benefits and is one of the prime sources of protien. It can be eaten as a sprout mixed with lemon juice and a pinch of salt - its excellent for children as it improves memory power. It cooks fast and has a sweetish flavour.  


Ingredients for pesarattu

Whole Green Grams- 1 cup
Raw Rice - 1/2 cup
Green chillies - 5 nos
Cummin seeds - one tea spoon
Ginger- 1 piece
Chopped onions - 1 no.


Process

Wash and soak green gram and raw rice in a two seperate bowl for 5 to 6hrs.


Grind the rice and dal in separately in a mixer/grinder and mix it well. Add required salt to the batter and and keep it for fermentation for 5-6 hours.
Wash and clean green chillies and ginger. Grind these along with the cumin seeds into a paste.
Mix this paste into the batter and add water if required to get the right consistency.


Chop onions into small pieces. Keep it aside.

Take a tawa/pan/griddle and Heat it. Take a ladle full of batter and pour it in the centre of the griddle and spread  the moong dal dosa batter into a round shape. Sprinkle some of the finely chopped onions.Drizzle oil at the sides and centre. Cook in medium flame. 
Once the dosa is half cooked, turn dosa on to the other side till both sides are well cooked and brown. It would be a bit crispy. Make it this way and serve it with ginger chutney, coconut chutney or coriander chutney.


#andhrarecipes; #moongdal, #greengram, #dosa, #kidsrecipes

Saturday 1 August 2015

Aloo Paratha - Potato stuffed Indian Bread roasted with Ghee/butter


My favorite dish in  north Indian recipe is Aloo Paratha.
First time I tasted this paratha I thought how these are made ...just after marriage time!! 
At that time I didnot know how to make even a chapati.. when I make chapatti, its shape used to be the Indian or australian map or any other shape other than round!! 

But since my husband wanted chapatti for dinner daily...and that helped me to make chapatti the right way and finally it started coming out the way it must come out - round!!

Thats why I could think of preparing this Aloo paratha; else it would have been a joke trying to prepare paratha without even knowing to make a chapati...
Aloo Paratha is basically a Punjabi dish...There are also similar varieties of parathas...Let us look at how we can make this delicious dish.


Ingredients:

For Dough

Wheat flour/Atta -2 cups
Salt to taste
Water as  needed
Oil/Ghee/Butter - 5 tblspoons

For Filling

Potatoes -2 large boiled
Chilli powder-1 tsp
Jeera powder-1 tsp
Chat Masala powder-1 tsp
Green chilly- 1 no
Salt to taste


Process

Take wheat flour,salt and water in a bowl and make it a soft dough. Add more water if required while kneading. 
Cover it for 30 mins.Keep it aside.


Boil the potatoes in the pressure cooker. Peel and chop the boiled potatoes and mash them.The potatoes must be mashed well...


Now add the  chopped  greenchillies, garam masalapowder, red chilly powder, dry mango powder and salt. 

Mix the spices powders and greenchillies with the mashed potatoes very well. Check the salt and if needed add it. Add chilly powder. Keep it aside.


After 30 minutes take the dough and divide into lemon size balls. Then take two balls and roll them out.


Then take one roti and spread it over with the potato/aloo masala. Wetting our palms with water or applying oil ensures that the masala does not stick to our palm.
Cover it with other roti, and press and seal the edges with finger tips. Dust some flour on the top of the stuffed paratha. Again roll them lightly.


 Take a tawa and heat it. Put this on the hot tawa. Cook it on the tawa in a medium flame. 


Then flip over spread some oil/ ghee/butter.


Flip again and spread the oil/ghee/butter. Keep doing this a few times till the paratha gets cooked as shown.

Aloo paratha is ready. Serve with achaar and curd or raita.


#alooparatha, #punjabicuisine, #vegetarianrecipes, #vegetarian, #kidsrecipes